I used to tape my gels on my top tube for triathlon races – it is easy but not really convenient. As I am now going for longer races, I thought it would be a good time to look at smarter ways to store my food and water on a triathlon.
Disclaimer: The Triathlon Tips of My Tri World are reader-supported. When you buy through links, I may earn an affiliate commission.
1. STANDARD BOTTLE BETWEEN THE AERO BARS
How does it look like:
Here is an example with the Profile Design HC Mount (Amazon affiliate link). The two parallel bars are rigid and sit on top of the aero bars. This system is held with 4 zip ties (one at each extremity of those rigid bars). You can also find other models that hold on to the bars with straps.
Advantages
It is simple to install and can fit any standard bottle. Having the bottle between the aero bars minimizes your movements to reach the bottle.
Disadvantages:
You have the risk of losing your bottle if the road is too bumpy. It is also not really convenient to drink from the standard bottle, which brings us to way #2.
2. BOTTLE WITH A STRAW BETWEEN THE AERO BARS
How does it look like:
The main advantage of this setup over the previous one is that you can drink using the straw. All you need is a specific bottle. You can use the same system as way #1 or buy the entire system as the Profile Designs Aero HC System (Amazon affiliate link).
Advantages
You don’t need to change your position for drinking. In some setups (like the one above), you can even refill the bottle during your triathlon.
Disadvantages:
Some setups start to be pricey. It also takes a bit more time to clean the bottle compared to a standard one.
3. AERO SYSTEM BETWEEN THE AERO BARS
How does it look like:
Quite similar to the bottle with a straw, this system has a different shape, which allows you to put more water in it. I personally bought the Profile Design FC35 (Amazon affiliate link). You can refill it from the top if needed. I found it really practical on smooth roads and for longer rides.
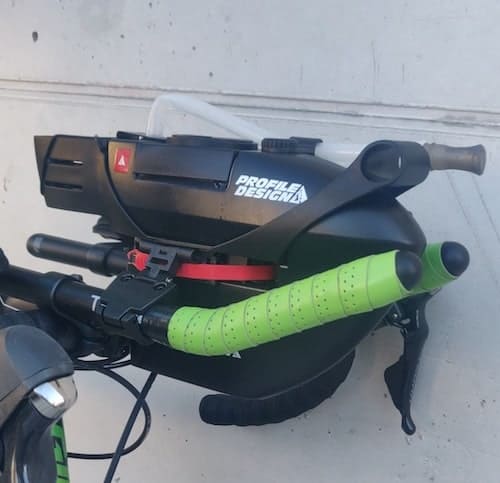
Advantages
As for the bottle with a straw, you won’t need to change your position for drinking. This system can fit a huge amount of water (35 OZ or 1L for the model above).
Disadvantages:
It is a bulky setup, and it is taking some time to put it on and off. Cleaning it is also a funny experience with this particular shape. I would recommend it only for people who do really long rides or races on smooth roads. For the rest of the triathletes, it can be more of a burden.
4. TAPE YOUR GELS ON YOUR TOP TUBE
How does it look like:
You simply tape your gels on your top tube using electric tape. The best is to tape each gel separately on their opening line. Once you are taking a gel, the plastic will break on the opening line, and your gel will be open.
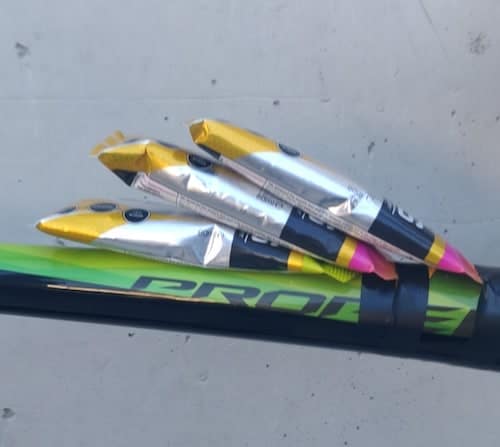
Advantages
Extremely easy and cost-effective.
Disadvantages:
Definitely not aero 🙂 The gels tend to fly around a bit and can rub your legs. I would not put more than 2-3 gels. Once your race is finished, don’t forget to clean your top tube, you might have some sticky leftovers on it.
5. BENTO BOX ON THE TOP TUBE
How does it look like:
Instead of taping your gels on your top tube, you can install a box on it and keep your gels inside. You can attach it to your top tube with either velcro straps or bolts (for compatible bikes).
Advantages
A lot of different options are available. It makes your bike cleaner compared to a line of gels.
Disadvantages:
If you like the design, I don’t see any disadvantages.
6. INTEGRATED HYDRATION IN THE FRAME
How does it look like:
You read it correctly: IN the frame. Some hydration systems can be inside your frame. To be more precise, you need to buy a specific bike that comes with that system. It means that the price tags of this system (and the same goes for ways #8 and #10 that we will see later on in the article) are really high.
If you are considering buying a new bike, it is definitely something you should look at. Here is an example of the Canyon Speedmax 2021 on their Youtube video:
Advantages
Integrated into the frame.
Disadvantages:
Well, you need the bike for it, so the price is probably the biggest drawback 😉
7. BOTTLE ON THE FRAME
How does it look like:
The most common option for cyclists is to put one or two bottle cages on their frame and use those ones. There are hundreds of different models; one aero example is the Elite Crono CX Cage (Amazon affiliate link).
Advantages
Affordable (except the carbon versions), simple to install.
Disadvantages:
Not ideal for drinking when you are on the aero bars.
8. STORAGE ABOVE BOTTOM BRACKET
How does it look like:
Some of the triathlon bikes will come with a storage box above the bottom bracket, which you can use for storing gels and/or tools. You can see it on the Canyon video above (way #6) or on some Cervelo bikes, for example.
Advantages
Easy to store a couple of gels.
Disadvantages:
Only available on the corresponding bikes.
9. BOTTLE BEHIND THE SADDLE
How does it look like:
You will need first a specific mount that costs anywhere between $15 to $100. It is relatively cheap and easy to put on. Those mounts will accommodate either one or two bottle cages.
Advantages
It gives you another option for one or two bottles without impacting too much your aero drag. You can use those for hydration or tool storage.
Disadvantages:
You would be surprised how easy it is to lose those bottles when you ride bumpy roads. If you plan to use it for hydration, make sure to invest in a strong bottle cage.
10. BOX UNDER THE SADDLE
How does it look like:
Let’s talk first about the bags that you can put under your saddle. I would not recommend using those for storing nutrition on race day. There is no (safe) way you can reach your gels while riding.
Some triathlon bikes come, however, with an integrated box under the saddle, which you can use for hydration. There is a straw going from the front end of the bike all the way to the box under the saddle. You can check the video below from Talbot Cox on Youtube. Sarah True explains this system on her bike.
Advantages
Specialized claims aero advantage from this system.
Disadvantages:
As for all integrated systems, it comes only with the corresponding bikes.
11. AID STATIONS
How does it look like:
In most (to not say all) races, you will have aid stations on the bike and/or run courses. The number of them depends on each organizer and your race distance.
There is always water available, plus some specific drinks and food. You can use the water bottles to replace your current ones or use them to refill your hydration system. In both cases, make sure to throw your bottles only where it is allowed! You could otherwise get disqualified.
Advantages
You don’t need to carry dozens of water bottles and gels with you from the start of the race.
Disadvantages:
You don’t always know what you will get there. Some organizers are writing it on their website, but it is far from being common.
12. TRANSITION AREAS
How does it look like:
It doesn’t matter if you have a classic bag, a box, or a specific transition bag (see the article of my wife, Anna: Are Transition Bags Really So Useful?), on your place at the transition area, you can always use this place to store some hydration or food. A good idea is to freeze your water bottle(s) before the race, so they are still cold when you take them for the bike or the run.
Advantages
Easy way to have an extra drink or gel available.
Disadvantages:
Depending on the weather condition and on the course length, your bottle(s) might be too warm to drink before you start the run.
13. POCKETS IN A TRI SUIT
How does it look like:
If you have some pockets on your tri suits, consider putting some gels in those during the first and/or second transition.
Advantages
Easy storage solution.
Disadvantages:
Not every tri suit has pockets.
14. RACE BELT
How does it look like:
You will find places to store extra gels in some race belts.
Advantages
An easy and relatively cheap solution to carry gels.
Disadvantages:
None
15. HANDHELD WATER BOTTLE
How does it look like:
Here is an example of the Amphipod Hydraform (Amazon affiliate link). You can run while holding the bottle in one of your hands. I can see its use in training where you need to take water with you (I personally prefer a light backpack). For racing, I honestly don’t think it is necessary apart from extreme weather or extreme triathlons.
Advantages
Being able to drink water whenever you want during the run.
Disadvantages:
Need to run with it during the entire run.
As you can see, there are a lot of different storage solutions available. Before investing in one, you should consider which kind of race you want to do. For short-distance races, it is not that important to carry a lot of food with you.
A hydration system is one of the 20 essential triathlon gear on our list for race day, have a look at this article to find out more about the 19 others.